Space may be the final frontier, but restoration revives the charm of the withering treasures of our world. Whether you are a Star Trek fan, or purely interested in the process of restoration, today's blog post is sure to be a galactic adventure.
Join us on MISSION RESTORE SPOCKBOX!
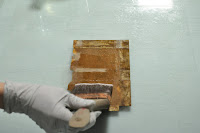
As you can see in the image above, this rare 1970's Star Trek cereal box has endured substantial damage. With blistering edges, surface damage, and a missing top portion, this box is very fragile. As the half-human, half-Vulcan, Spock once said, "Change is the essential process of all existence." Our job at Poster Mountain however, is to restore this artifact to its original condition, ensuring it can be preserved and appreciated for years to come.
Before reconstructing the missing pieces, we need to take the box apart. Carefully, it is deconstructed to a flat surface. At this point, we reinforce the areas that are flimsy or torn using wheat paste and strong archival tissue. (You can see little pieces of tissue hanging out in the image above.)
Giving artwork a bath may seem unnerving, but that's just what we do next! Completing this phase in a delicate, yet timely manner is essential. It's also worth noting, each item we get in is unique, and not all pieces can handle moisture well. This is another of the infinite reasons to leave restoring your valuables to the professionals.
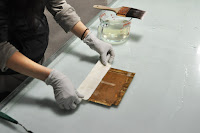
Once it's fresh and clean we brush a layer of gelatin onto the back.
To construct the perfect patch, we use an identical sized cereal box as a tracing template.
The patch is glued down to the overlapping oakawara with an archival friendly wheat paste. Next, a thin coat of methylcellulose is used as a binding agent to melt the paper fibers of the patch and original structure together. The end result is a seamless transition from patch to paper. The structural repair is officially complete and now onto the aesthetic.
Finally, it's air brushing time! Well, almost. Before paint is applied, the areas we don't want to paint are masked off with tape. Then, using the airbrush, the patch is blended in to match the rest of the box.
And wala! It's finished and ready to be rebuilt.

It is carefully removed from the board by sliding a large pallet knife behind the hollytex. Once off the board, the hollytex is easily removed from the back of the structure without causing any damage. (Think of it as pulling a freshly baked cookie off parchment paper.

Using a bone-folder tool, the edges of the box are scored where the fold lines will be.
And there you have it, another restoration mission complete! We hope you enjoyed following along with us on this project. Until the next one, "live long and proper."✋


I am HERBALIST Dr Harry I am a well certified long-established herbal medical expert. I am a senior herbal practitioner in West African Traditional Herbalism, Also a graduating student of the Ancient Chinese Herbolog. I Cure Different Types Of Human Infections And Diseases Using Natural Roots And Herbs. My major areas of concentration are Sexually transmitted infections (STI), also referred to as sexually transmitted diseases (STD) and venereal diseases (VD) like;.” such as ; GENITAL SIMPLEX HERPES… and also kinds of infections and diseases. my email: drharryherbs@gmail.com
ReplyDeletelooking for the best cannabis brand that ships worldwide, below is my favorite cannabis brand
ReplyDeleteTrap University
looking for the best cannabis brand that ships worldwide, below is my favorite cannabis brand
ReplyDeleteTrap University box
This comment has been removed by the author.
ReplyDelete