I got lucky for this post since the title of the movie for this poster is also the perfect title for a Halloween week blog post: A-Haunting We Will Go from the great duo of Laurel and Hardy.
This week's post is also fun because we do a little Poster Mountain
retcon. (Yes, I know this is usually used in fictional tv, but I'm using
it in the way that we decided to retroactively fix something after the
poster had been linen backed. So there.)
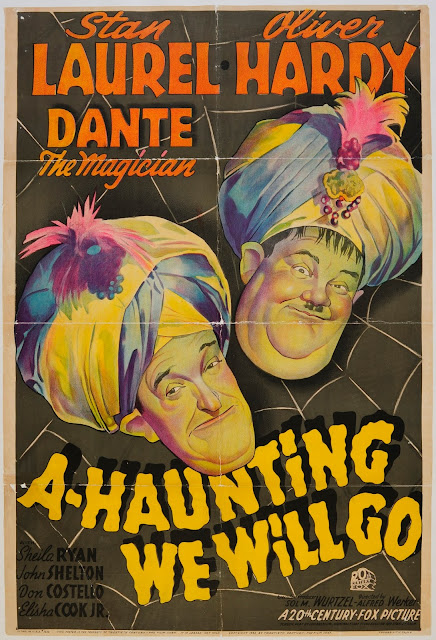 |
| Linen Backed Laurel and Hardy A-Haunting We Will Go |
When we received this piece it was mounted to craft paper, which we had to demount it from before linen backing it.
The client opted for full restoration and when I measured the poster, I realized that we were missing paper on the top, bottom and one of the side borders. What wasn't very obvious when the poster was first linen backed was that three of the four borders had been badly trimmed. We knew that we were probably going to have to add borders back, but it is easier if I can patch paper into a straight cut rather than having to follow an uneven edge. On top of that, the fold lines on this poster were stiff and would require a lot of time to get them flat enough to restore the ink loss.
 |
| This side border was missing about 1/4 inch of paper and was unevenly trimmed. |
So, John and I decided to do some retconning. In order to make adding borders back in easier and to address the difficult fold lines, we decided to demount the poster, do a gelatin facing and then remount it. And because we had mounted it, the demount process was pretty straightforward. We carefully stripped the linen off of the masa substrate, no solvents or heat necessary. (Please do not try to do this at home!) This was the poster's second demount!
 |
| John pulling the linen backing off of the poster. Do not try this at home! |
Next, we trimmed off the jagged areas of the border that were going to be patched anyway, giving me nice straight borders to work with!
At this point, the masa substrate and the poster are still adhered together. The glue that we use is water soluble, so the next step was to wash the poster and using our gelatin technique put a hollytex facing on the front of the poster. The purpose of the facing is to hold the poster together while we take the masa off the back.
 |
| The poster is face down on our capillary table and we have wet the entire poster and masa substrate. |
During a demount process like this, the poster is temporarily mounted facedown onto a board, with hollytex facing sitting between the front of the poster and the board.
 |
| Mounting the poster face down on a board with a hollytex facing. |
Once it is mounted on the board, we can then peel the masa away from the back of the poster. Usually, in one go and without causing additional damage to the poster. (Some types of glue such as the one that we use in our studio are water-soluble and allow us to do this with varying kinds of demounts, but many types of glue are not water-soluble and make the demount process tricky and often expensive because of the time necessary to cause the least amount of damage to the object being demounted.)
 |
| John started peeling away the masa substrate... |
 |
| ...and I got to finish it! Again, do not try this at home! |
After letting the poster dry we trimmed the hollytex facing to the borders of the poster and sanded away any leftover glue residue. Sanding the back has the added benefit of addressing the stiffness of the fold lines without causing damage to the image on the front and makes my job in prep much easier. After that, we handed the poster back to Robin to linen back it for the second time.
 |
| John trimming the excess hollytex |
The poster was linen backed with the hollytex facing still on it, but once the poster was mounted again we removed that facing and the poster was ready to be prepped! The right side of the poster was only missing about 1/4 of an inch, but the top and bottom borders were missing more than 3/4 of an inch.
 |
| A close up of the right and bottom borders where we added paper back. |
Borders are some of my favorite things to patch, but they're not really that interesting in terms of pictures. I choose vintage paper from our collection of paper (Seriously, we have boxes and boxes of posters and prints that aren't worth anything in terms of monetary value but have a huge value to us in terms of using the paper in our restoration process. We take donations!) Once I've got paper that is lighter in color and has the right texture, I cut out the size and shape of the paper patch and use that to add back in any missing paper.
Since we had decided to do a remount, the fold lines on this poster were lovely and smooth. I only needed to add a compound filler where there was paper loss and then sand that down in order to give our restoration team a smooth work surface.
 |
| One of the fold lines that was missing a small amount of paper. |
I have a new team member to introduce! Meet AB, short for Annabelle. She is a recent graduate of Occidental College where she majored in Fine Art. We're happy to have her as our newest restoration artist. And on this project, she was doing the masking for the airbrush shots.
AB and Gabe airbrushed the border, the yellow title, the orange names and a very localized background shot to restore the fold lines. We pretty much dropped AB into the deep end of the pool on this one since she did all the masking for this project. She did a superb job!
 |
| AB masking to airbrush the yellow title. |
 |
| Gabe used a very light hand and kept the airbrushing very local to the fold lines where pigment was lost in the gray background. |
The last area to be addressed were the fold lines that ran through Laurel and Hardy. Gabe used a combination of watercolors and colored pencils to detail these areas.
 |
| Post the last round of airbrushing and before the final step of detailing. |
The colors on this Laurel and Hardy litho are incredible in person and after restoration, they really pop!
 |
| Linen backed and fully restored |
Certain proprietary steps and procedures have been omitted. If you have any comments or ideas for things you would like to see us cover on our blog, please let us know! Additional questions regarding other work or your pieces, please contact us via email at postermount@aol.com or by phone 818.882.1214.
Also, check out our websites:
http://www.postermountain.com and
http://www.lapapergroup.com. Please feel free to leave comments or questions on the blog. For daily photos and updates check out Poster Mountain's Twitter and Instagram: follow us on Twitter @
postermount and
Poster Mountain on Instagram. Our subsidiary company, LA Paper Group will be showcasing the fine art side of the company: @
LAPaperGroup on Twitter and
LAPaperGroup on Instagram.


Awesome article, it was exceptionally helpful! I simply began in this and I'm becoming more acquainted with it better! Cheers, keep doing awesome! Custom star map
ReplyDelete