
The name of this post comes from a conversation with John about a very interesting Warhol print on a paper bag. In order to flatten the bag we were going to need to take it apart. So, as John and I were talking about how he was going to accomplish this, the possibility of having to completely wet the piece on the capillary table came up. John's very visceral response to that was, "Let's not poke that dragon in the face unless we have to." While we did not end up having to wash that particular piece, as it turns out we finally got a Warhol piece that we did wash.
The print in question is one of five unique screen prints of John Gotti done by Warhol in 1986. They were on display at the Revolver Gallery in Beverly Hills, which was the largest private collection of Warhol art works.


John Gotti was one of the most infamous faces of the mafia and Warhol created these images while he was standing trial. Revolver Gallery writes, "John “Teflon Don” Gotti was a famous mobster from the Gambino family. Charged with murder, loansharking, racketeering, obstruction of justice, illegal gambling, tax evasion and more, he was, and is, the most infamous member of the Mafia. Andy Warhol had been known for his portraits at the time and caught the attention of Time Magazine in 1986, which was dedicating a cover to Gotti in their “Mafia on Trial” September issue. It was during this time that Gotti had been arrested and was standing trial for racketeering, for which he was acquitted. Six years later, he was charged for murder and sentenced to life in prison without parole. Warhol was known for creating portraits of the beautiful and glamorous, but when Time Magazine commissioned him to make this cover, he had a new type of subject to add to his portfolio. Although Gotti did not fit into Warhol’s usual movie star-musician-artist circle, he did possess some of the attributes that Warhol loved about celebrity life. Gotti was known as “Dapper Don” because of his personality in front of news cameras and his expensive clothing. He was glamorous in his own right, and a celebrity in his crime driven world. The public knew John Gotti’s name.
Andy Warhol was able to take this monster of a man and turn his image into a colorful and contemporary piece of artwork. He chose to illustrate Gotti based off of a publicity photo where he is in a nicely tailored suit with an intimidating demeanor about him. Much like his Mick Jagger portraits, Warhol applied collaged pieces of paper in the background as well as a combination of photographic imagery and hand-drawn lines. The five unique prints are all on white backgrounds as he utilized the colored paper to create the color schemes. Once again geometry and intentionality comes into play with this work, as Warhol carefully placed the collaged pieces and the lines to create a well-balanced, nicely composed piece of art. He created multiple versions of this portrait, and Time chose the one that they felt best depicted the man in their article, John Gotti." - from Revolver Gallery's website

The print that needed some TLC has three pieces of silkscreened paper collaged together, over which Warhol added several more layers of silkscreening. One of the pieces (the lighter green on the right side) was damaged with several tears and a missing chunk out of it (right by Gotti's lapel).
The paper was glued down using rubber cement, which does not age well. But John was able to remove it by sliding one of his knives between the layers of paper and slicing the top paper away from the bottom. (Don't worry, no prints were harmed in the making of this blog, just glue)

 This ladies and gentleman, is what 30 year old rubber cement looks like! Not a pretty picture.
And just to be contentious (because it wouldn't be a Warhol piece if it weren't) one of the corners had a crease in it which tore completely during the removal process.


Before starting anything John had tested all of the inks used for this print and none of them were water soluble (Although that did not mean John wasn't a little nervous about the next step). The plan was to wash (Yup! We washed a Warhol!) and apply tissue patches to the back across the damaged areas. This would stabilize the weak spots of the print so that not only would we be able to fix the tears, but reattaching the corner was easier this way as well.
The process of wetting the piece, getting the tears and the corner realigned again all went smoothly. John then applied tissue patches to the back using gelatin. (The tissue also helps provide a foundation for us to do any repairs from the front.)


Don't worry, John's not taking an exacto knife to a Warhol, the tissue patches that we used to reinforce the tears had to be trimmed away so they won't be seen from the front.

Sometimes putting a collage piece back together can be tricky, however, Warhol had made our job easier because we could use the printed lines of Gotti's jacket as a guide to reposition the print.

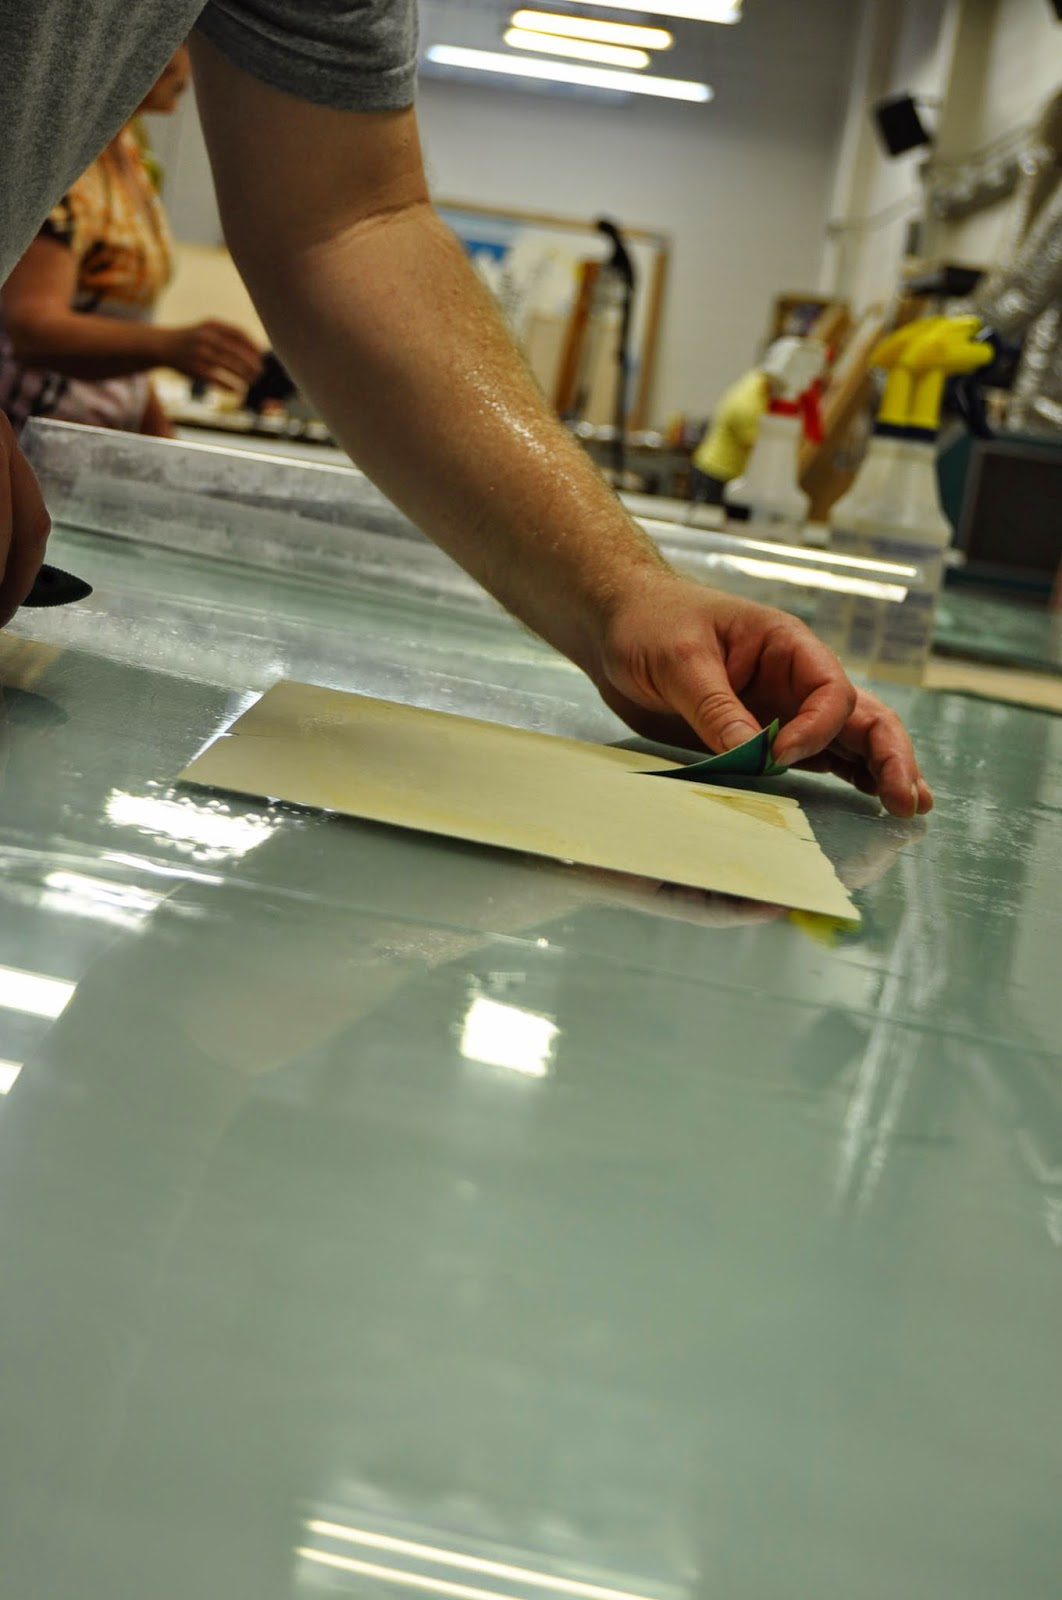
Finally all that was left was to (carefully!) glue it back into position. The yellow marks on the back are the remnants of that old, nasty rubber cement. John used wheat paste (a much safer long term option) to glue the piece back together.


The print in question is one of five unique screen prints of John Gotti done by Warhol in 1986. They were on display at the Revolver Gallery in Beverly Hills, which was the largest private collection of Warhol art works.
John Gotti was one of the most infamous faces of the mafia and Warhol created these images while he was standing trial. Revolver Gallery writes, "John “Teflon Don” Gotti was a famous mobster from the Gambino family. Charged with murder, loansharking, racketeering, obstruction of justice, illegal gambling, tax evasion and more, he was, and is, the most infamous member of the Mafia. Andy Warhol had been known for his portraits at the time and caught the attention of Time Magazine in 1986, which was dedicating a cover to Gotti in their “Mafia on Trial” September issue. It was during this time that Gotti had been arrested and was standing trial for racketeering, for which he was acquitted. Six years later, he was charged for murder and sentenced to life in prison without parole. Warhol was known for creating portraits of the beautiful and glamorous, but when Time Magazine commissioned him to make this cover, he had a new type of subject to add to his portfolio. Although Gotti did not fit into Warhol’s usual movie star-musician-artist circle, he did possess some of the attributes that Warhol loved about celebrity life. Gotti was known as “Dapper Don” because of his personality in front of news cameras and his expensive clothing. He was glamorous in his own right, and a celebrity in his crime driven world. The public knew John Gotti’s name.
Andy Warhol was able to take this monster of a man and turn his image into a colorful and contemporary piece of artwork. He chose to illustrate Gotti based off of a publicity photo where he is in a nicely tailored suit with an intimidating demeanor about him. Much like his Mick Jagger portraits, Warhol applied collaged pieces of paper in the background as well as a combination of photographic imagery and hand-drawn lines. The five unique prints are all on white backgrounds as he utilized the colored paper to create the color schemes. Once again geometry and intentionality comes into play with this work, as Warhol carefully placed the collaged pieces and the lines to create a well-balanced, nicely composed piece of art. He created multiple versions of this portrait, and Time chose the one that they felt best depicted the man in their article, John Gotti." - from Revolver Gallery's website
The print that needed some TLC has three pieces of silkscreened paper collaged together, over which Warhol added several more layers of silkscreening. One of the pieces (the lighter green on the right side) was damaged with several tears and a missing chunk out of it (right by Gotti's lapel).
The paper was glued down using rubber cement, which does not age well. But John was able to remove it by sliding one of his knives between the layers of paper and slicing the top paper away from the bottom. (Don't worry, no prints were harmed in the making of this blog, just glue)
And just to be contentious (because it wouldn't be a Warhol piece if it weren't) one of the corners had a crease in it which tore completely during the removal process.
Before starting anything John had tested all of the inks used for this print and none of them were water soluble (Although that did not mean John wasn't a little nervous about the next step). The plan was to wash (Yup! We washed a Warhol!) and apply tissue patches to the back across the damaged areas. This would stabilize the weak spots of the print so that not only would we be able to fix the tears, but reattaching the corner was easier this way as well.
The process of wetting the piece, getting the tears and the corner realigned again all went smoothly. John then applied tissue patches to the back using gelatin. (The tissue also helps provide a foundation for us to do any repairs from the front.)
(This one was just too good not to include!)
After the tissue was applied to the back, it was time to temporarily mount the poster to a sheet of Hollytex and a board to dry.

The first step in restoration is prep work, where we fill the holes, any
tiny gaps or imperfections that will show once we start applying paint.
Then comes masking, to cover any areas that aren't going to be
airbrushed. (Neither of these steps photograph that well unless the repairs are incredibly dramatic, although we have a tremendous staff working on each of these steps.) Once a piece has been masked, then Aaron goes to work. In
this case there were three areas that needed to be airbrushed, the bright green and the patched area in the teal.
(Aaron pulling back the first layer of masking)
Aaron finished the first round of airbrushing, then the print went to Eric for some detail work. He touched up the small chunk that was missing in the blue and red lines of Gotti's lapel.
The print went one more round with Aaron. To really blend in our restoration with the original print he did a thin layer of airbrushing in that very vibrant teal.
Once the restoration was complete, the final step was to put this print back into place amongst it's fellow collaged pieces. John removed it from the board and the hollytex.
Don't worry, John's not taking an exacto knife to a Warhol, the tissue patches that we used to reinforce the tears had to be trimmed away so they won't be seen from the front.
Sometimes putting a collage piece back together can be tricky, however, Warhol had made our job easier because we could use the printed lines of Gotti's jacket as a guide to reposition the print.
Finally all that was left was to (carefully!) glue it back into position. The yellow marks on the back are the remnants of that old, nasty rubber cement. John used wheat paste (a much safer long term option) to glue the piece back together.
Et Voila! Warhol Restored!
This was a fun piece for everyone to work on and a relief to have a relatively simple solution to a Warhol (they are often very complicated and obstreperous pieces to restore, although we are more than up for the challenge!)
Hello everyone i want to use this medium to inform the world on how i got cured from Herpes at first when i had symptoms back in 2014 i went for test and it came out positive i lost hope of getting a better relationship or marriage, everything changed when i met Dr Harry i contacted explained everything to him and he said he has the cure so i decided to order it from him, so i actually did after 2 weeks i went for test and i was negative i'm forever grateful to him.he can also cure
ReplyDeletehpv
epilepsy
sickle cell anaemia
diabetes
copd
barrenness
cancer
wart
psoriasis
pityriasis rosea etc.
email: drharryherbs@gmail.com
Print Large Prints are an excellent way to showcase designs, promotions, and branding effectively. High-quality large-format printing, like the services offered by Printshape, truly helps businesses create a strong visual impact and attract attention."
ReplyDelete