Since the advent of photography, the popularity of hand drawn or painted portraits has slowly dwindled. They are considered old fashioned or a novelty and have been phased out in most of our homes. A few weeks ago, however, a client brought in a pastel portrait of his brother that was drawn at Pacific Ocean Park in Santa Monica in 1961, the subject was 9 years old at the time. The glass in the frame had been broken and had damaged part of the drawing.
 |
| Pictured: Before shot of the pastel portrait removed from its frame. |
The portrait had a tear through the upper left corner. In addition there was some discoloration due to oxidation visible throughout the background. The mat board had protected the areas that were still grey, the original paper color, but the rest of the paper had oxidized. The condition of the paper was a factor that we had to take into account during the mounting and restoration processes.
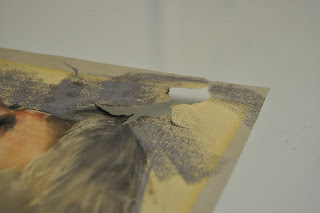 |
| Pictured: Tear in the upper left corner and the oxidation discoloration is clearly visible. |
 |
| Pictured: the back of the portrait and the tear through the top left corner. |
 |
| Pictured: the damage is even more visible with the help of the light table. |
We applied a fixative to the existing pigments before beginning the mounting procedure, but because of the mobile nature of chalk pastels pigments we still proceeded with caution. Normally with pieces where the medium is unstable we use the resizing technique that John developed. However, this was not a good option with this piece because the paper was very porous and we were worried that this might cause more damage. Our goal is always to preserve the integrity of the piece through both the conservation and restoration processes.
 |
| Pictured: Melissa examining the piece before beginning work |
Melissa worked under John's direction during the conservation process. The piece was mounted so that she could fix the tear and then apply pastel over the top so that the piece would look as good as new by the end.
 |
| Pictured: Robin and Melissa measuring the Okawara paper substrate against the portrait. |
Once the piece had been sprayed with fixative, the pastels pigments were stable enough for us to carefully mount it.
 |
| Pictured: Melissa making sure that she has the correct size of Mylar for the piece. |
 |
| Pictured: Melissa spraying the piece. |
 |
| Pictured: Melissa carefully applying another layer of Mylar over the top that would allow her to gently work the piece through the mounting process. |
 |
| Pictured: Melissa flipping the piece over. |
 |
| Pictured: Melissa spraying more water on the Mylar on the back of the piece. This allowed her to smoothly squeegee the piece. |
 |
| Pictured: The tear is clearly visible through the Mylar. |
 |
| Pictured: Melissa gently massaging the piece. |
 |
| Pictured: Melissa squeegeeing off excess water. |
Once the piece had been sprayed and was face down on the glass table, the Mylar was removed from the back. Then glue was applied to the back of the piece. We carefully wiped away any excess water and glue from the Mylar underneath the paper so that only the paper would stick to the substrate.
 |
| Pictured: Melissa removing the Mylar from the back of the piece. |
 |
| Pictured: Derry and Melissa removing excess water from the Mylar underneath the piece before applying the glue. |
 |
| Pictured: Melissa applying glue to the back of the piece. |
 |
| Pictured: Melissa removing excess glue from the back of the paper with a roller. |
 |
| Pictured: Melissa squeegeeing off the excess glue from the edges of the Mylar. |
After the glue had been applied the piece was mounted to an Okawara paper substrate on a melamine board. This provided a stable surface for the piece and for Melissa to work on.
 |
| Pictured: Tears in the paper from the back. The paper that was torn now lays relatively flat, however, the tear is still clearly visible. |
 |
| Pictured: Derry and Melissa moving the piece on the Mylar over to be mounted. |
 |
| Pictured: Melissa and Derry flipping the piece face up before mounting it on the Okawara paper and board. |
 |
| Pictured: Centering the piece on the substrate |
With the piece gently resting on top of the paper the next step was to apply pressure evenly across the surface to join the paper of the portrait to the Okawara substrate.
 |
| Pictured: Melissa and Derry smoothing out any air bubbles. |
 |
| Pictured: Melissa applying pressure to the piece with the Mylar still on top so that the piece evenly joined with the paper substrate. |
 |
| Pictured: Melissa removing the Mylar from the top of the piece. While the piece is wet it tends to stick to things, so she lifts the Mylar off at an angle so that the paper stays mounted to its substrate and does not come off with the Mylar. |
Once the piece is mounted to the substrate and melamine board it needs to dry. After it has dried completely Melissa began to restore the damaged area. She started by repairing the tear lines. She used a combination of glue and filler to restore the damage before burnishing and smoothing the lines down.
 |
| Pictured: Melissa checking the edges of the tear before beginning work. |
 |
| Pictured: Melissa gluing down the tear lines. |
 |
| Pictured: Melissa burnishing the tear lines. |
 |
| Pictured: Melissa adding filler to the areas of the tear that had lost paper. |
 |
| Pictured: Filler drying in some of the tear lines. |
Once the glue and the filler had dried, Melissa was then able to go back in with pastels and restore the image that had been damaged by the tear. She carefully layered the pastels over the repaired area so that it matched the existing color.
 |
| Pictured: Melissa beginning to add color over the patched area of paper. |
 |
| Pictured: Melissa with her pastels and watercolors adding in color. |
Once Melissa had finished restoring the piece, all that remained was for it to be removed from the melamine board. A thin knife was inserted between the board and the Okawara paper to demount it from the board, but the piece remains mounted to the Okawara substrate.
 |
| Pictured: Melissa demounting the piece and substrate from the board. |
Tadaaa! No sign of the tear in the upper left corner remains!
Melissa took the wheel on this project, so she also got to hand the piece over to the client. And of course we needed to capture that moment!
 |
| Pictured: Melissa handing the portrait over to the client, who is the brother of the boy pictured. |
It should be noted that several crucial steps in our process have been omitted. If you have any questions please feel free to contact us via email at postermount@aol.com or by phone at 818.882.1214. Also check out our websites: www.postermountain.com and www.lapapergroup.com


Comments
Post a Comment