DISCLAIMER: This blog post contains images related to the
Star Wars franchise, specifically a French
Return of the Jedi poster. The poster depicted is a copyright and trademark of Lucasfilm Ltd., was distributed by 20th Century Fox and is used by Poster Mountain Inc. with permission from the poster's owner. No copyright infringement is intended. We do not claim the art work as our own; these images are being used exclusively for Poster Mountain's conservation database.
Onward.
Poster Mountain sees a lot of
Star Wars memorabilia. Tons, all the time, but we don't mind. If you're going to own a movie poster, why not go for a classic? Those movies (the older ones at least) have withstood the test of time. They are the beginning and the end. They were a technical feat for their special effects, and they had actual content. How many modern day movies can claim both those things?
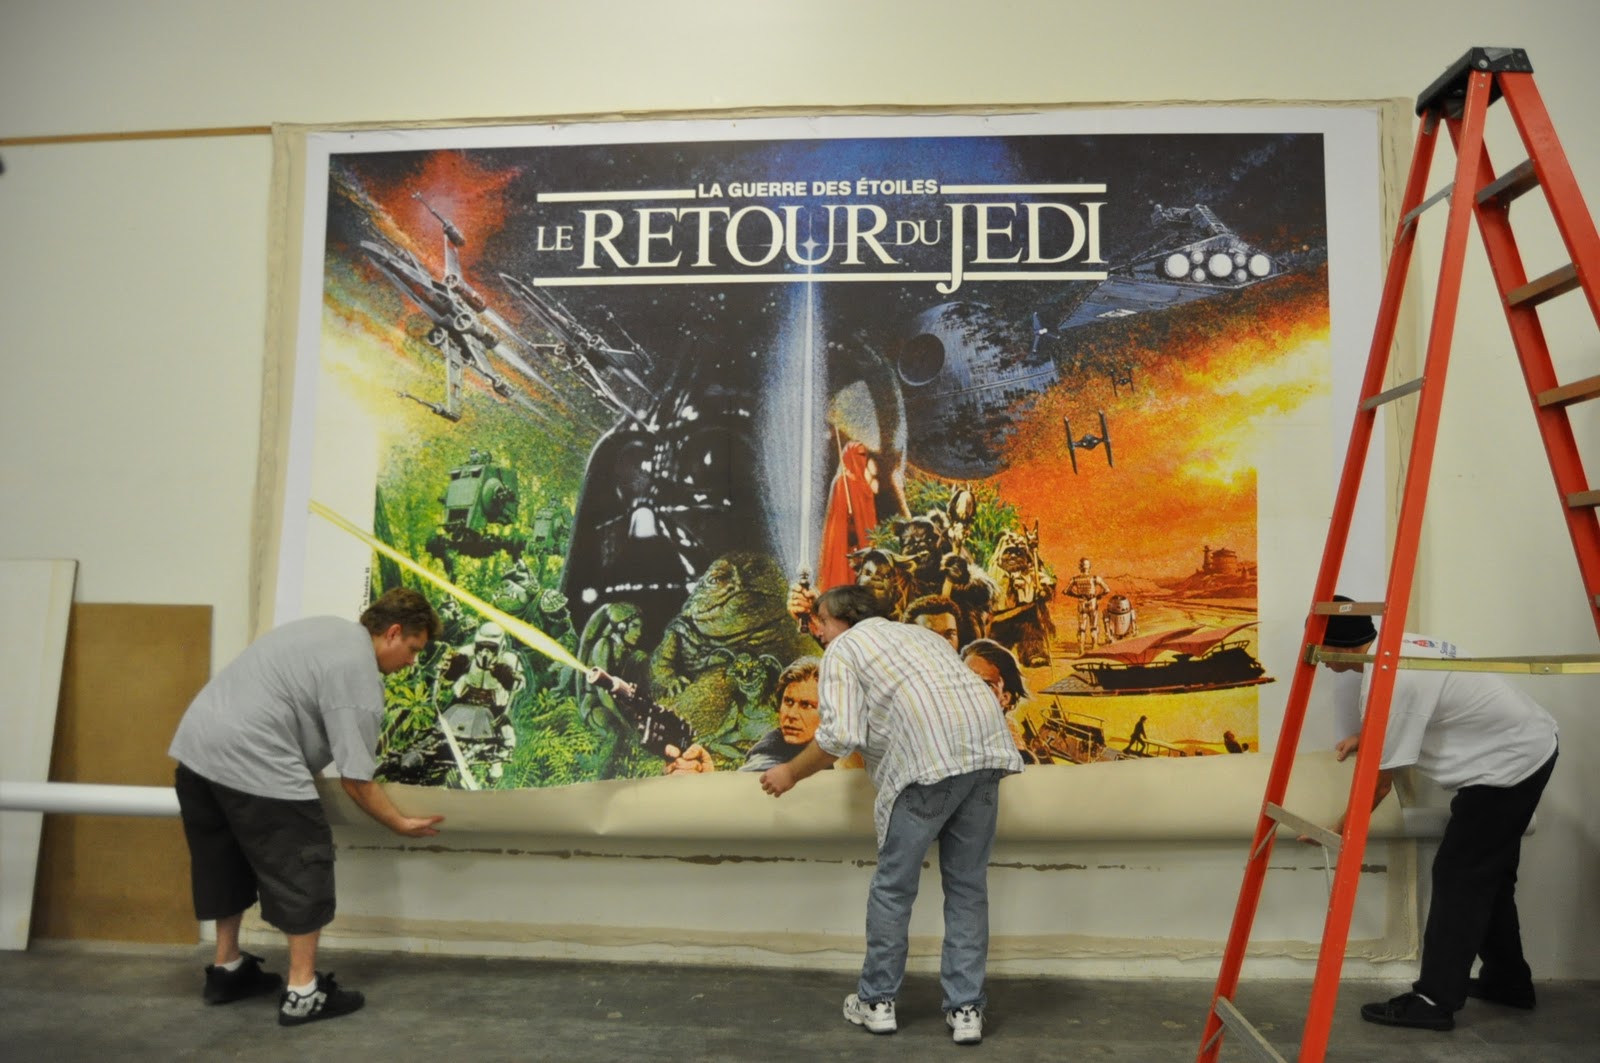
John Williams (not the composer) is one of our best clients. We have helped him conserve and restore his vast Star Wars collection over the years. Recently he brought in a French eight-panel billboard to be mounted on linen. This is not a small project. Most of us living in LA don't have the 10' x 13' wall space needed to display a poster this size!
As you might imagine, we don't often get a chance to mount posters this large, but believe it or not this is not the largest we've done. Click
here for that video.
The first step was creating a space big enough to mount this on. Luckily for us this is not the largest poster Poster Mountain has mounted over the years. (Check out the youtube.com video of John and co. mounting a Bancroft poster to see the biggest poster we have ever mounted:
http://www.youtube.com/watch?v=Bv3zyENW0Kw) Anyway, our first step was to mount linen to the wall because that is the largest surface we have to work on.
 |
| Pictured: Aaron stapling linen to the wall. Don't let the picture fool you, he is about 12 feet up in the air. |
After we had a workable surface we could start the process of mounting the actual poster. Large scale items like this are usually printed out in sheets with crop and overlap marks that allows for easy assembly once it has reached its destination.
 |
| Pictured: This is how a large scale poster looks when it gets to us, in pieces. |
Sometimes it is like assembling a massive puzzle. Luckily this one was pretty simple and in good condition.
 |
| Pictured: Gabe unfolding the sheets. |
 |
| Pictured: The partially pieced together poster. |
Once the poster was ready to be mounted, we had to finish preparing the mounting surface. Because bulk paper comes in specific sized rolls we had to cut several sheets of Masa paper to fit under the poster. It took about 40 feet of Masa paper to cover the linen. We also had to apply glue directly to the linen and this needed to happen quickly enough that the glue didn't dry before the Masa paper was applied.
 |
| Pictured: Robin measuring and cutting one of the sheets of Masa paper. |
 |
| Pictured: Gabe, John and Aaron applying glue to the linen. |
 |
| Pictured: Robin wetting down the Masa paper before it was mounted to the linen. |
Each piece of Masa paper had to be individually wetted down and then applied to the linen. It was carefully layered over the linen, making sure that it was straight and that there were no air bubbles in between the substrata. It was a company wide effort to mount this poster because we were working on a large scale and we had to move quickly enough that the wet surfaces didn't dry out.
 |
| Pictured: Aaron and John mounting the first piece of Masa substrate. |
 |
| Pictured: While Aaron and John smooth down the first piece of Masa, Gabe continues to apply glue. |
 |
| Pictured: Aaron, Gabe and John putting up the second Masa sheet of four. |
Robin and the girls began to prepare the poster itself for mounting, while John directed the boys in the continuing application of the Masa substrate. It wasn't until we looked through all the photos that we had of this project that we realized the division of labor had accidentally been divided by gender. The reason for this was that most of the girls would not climb up the tall ladder, so that left the boys to do it.
 |
| Pictured: Robin spraying down the back of the poster. It is resting on top of a sheet of Mylar. |
 |
| Pictured: Robin applying glue to the back of one of the Star Wars poster pieces. |
 |
| Pictured: Robin removing excess glue. |
As John finished prepping the linen and Masa paper, Robin with some help from the rest of us had each piece of the poster ready to be mounted.
 |
| Pictured: John carefully mounting the first piece of the Star Wars poster using with a sheet of Mylar over the top. He had to make sure that there was enough room that we wouldn't run out of linen, but not so little that we couldn't cut it out easily. |
 |
| Pictured: John squeegeeing the Mylar and the poster so that it adheres to the Masa substrate evenly. Aaron applying glue in the background. |
John and the rest of the crew began to mount the individual pieces of the poster while Gabe and Aaron continued to apply glue and then the Masa to the linen.
 |
| Pictured: Aaron and Gabe, working like a well oiled machine to put the third sheet of Masa up. |
 |
| Pictured: Gabe spraying down the last sheet of Masa, while John and Robin work in the background to prepare the poster. |
 |
| Pictured: Gabe and Aaron putting up the fourth and final sheet of Masa paper. |
 |
| Pictured: Katie helping John to mount the second piece of the Star Wars poster. |
 |
| Pictured: Antonia and John (hidden behind one of the largest sections of the poster) flipping this piece over between two sheets of Mylar. |
 |
| Pictured: Antonia squeegeeing off excess water before applying glue to the back of the poster. In the background is Robin working on another piece and Gabe, Aaron and John smoothing down the last piece of Masa paper. |
Normally we simply have to turn around to mount any posters that have been prepped on our glass topped wet tables, but because of the scale of this particular piece we had to maneuver through an obstacle course of tables to reach the linen mounted on the wall. In addition we were also moving a table around each time we mounted one of the top pieces because we only have one tall ladder that was being used already and we needed something else to stand on while mounting the upper most pieces.
 |
| Pictured: Antonia and John moving the one of the poster pieces over to be mounted. |
 |
| Pictured: Antonia and John using the overlap marks to line up the third piece of the poster with the two already up. |
This project was large enough that everyone got involved and thus gets to be part of this blog post!
 |
| Pictured: Derry lifting the Mylar and a piece of the poster off the glass topped table. |
 |
| Pictured: Derry mounting the fourth piece of the poster. She is looking for the crop mark in the upper left corner of the piece in her hands to line up with the corresponding marks on the other sheets. |
 |
| Pictured: Derry squeegeeing the poster down to evenly adhere it to the Masa and remove any air bubbles. |
 |
| Pictured: John mounting the fifth piece. Notice that the table has moved in several of the photos? We used a palette jack to move this table around and to give us a stable surface to extend our reach up to the top. |
 |
| Pictured: A shot across the workshop of the French Return of the Jedi Poster in the background and two finished window cards on the table in the foreground. |
We took almost 400 photos documenting this project. We realize that the photos you see here are some what repetitive, but they give a comprehensive look at a large scale version of the tasks that Poster Mountain undertakes everyday. We put this amount of thought and effort into each piece that comes through the workshop.
 |
| Pictured: John and Aaron mounting the second to last piece. |
 |
| Pictured: This is a close up of John using the crop marks (when everything is properly lined up, the crop mark looks like a small cross) to line up the seventh sheet. |
 |
| Pictured: Once John had lined everything up, he and Aaron smoothed the Mylar and poster down making sure that everything stayed aligned. |
 |
| Pictured: Melissa and John moving the last piece of the poster to the wall mounted linen. |
 |
| Pictured: John lining up the last crop mark. |
Finally, we were done mounting! The poster had to dry for an extended period of time before it was ready to be cut out.
The day that we mounted the
Star Wars poster was also Katie's birthday! So we all got to work on a big project and then have cake to celebrate Katie's birthday.
 |
| Pictured: Katie with her birthday cake. |
The poster's owner, John Williams, came in a few days after we had mounted the billboard to see it up on the wall before it was rolled up. (It was also Aaron's birthday, so we got to celebrate that as well!) John does not have a wall big enough in his home to display this on, so he is planning on storing it or possible loaning it to a museum. But we waited for him to come in and see the poster in all its glory before we cut it down from the wall. Luckily for us he brought in props and we got to have some fun before finishing the project!
 |
| Pictured: John W. holding a light saber! |
 |
| Pictured: John starting to cut out the poster, much easier when you have a light saber! |
After we finished playing around it was time to start cutting the poster down from the linen mounted to the wall. John cut the bottom and two sides first, then as he was cutting the top he put a couple of tacks in to hold it up.
 |
| Pictured: John cutting the linen backing free from the wall. He cut the sides and bottom first. |
 |
| Pictured: Gabe, John and Aaron rolling the poster up around some piping to make it easier to handle once the top part was cut out. |
Aaron, Gabe and John W. helped roll it up from the bottom, then John finished cutting the top and gave one good yank that popped the tacks out of the wall and let the top drape down over the guys holding it up so that the poster was finally free from the wall. This way the poster was not able to fall or become damaged when it was finally removed from the linen on the wall.
 |
| Pictured: John put tacks across the top to hold it up while he finished making the last cut. |
 |
| Pictured: Gabe, John W. and Aaron holding the rolled poster up while John is poised to pull the tacks out. |
 |
| Pictured: John pulling the top of the poster free. Gabe, John W. and Aaron holding the rolled lower portion up with Maggie the dog keeping an eye on everything. |
 |
| Pictured: Top of the poster flopping down over Gabe, John W. and Aaron. |
 |
| Pictured: This one was just too funny not to include. Gabe, John W. and Aaron are covered down to their shoulders by the top of this huge poster. |
 |
| Pictured: Gabe, John W. and Aaron rolling up the poster. |
Once the poster was free from the wall we had to trim all of the edges so that they looked neat and even.
 |
| Pictured: Gabe, Aaron and Robin unrolling the poster from the pipe before John trims the edges. |
 |
| Pictured: John trimming the edges so that it has a neat border of the Masa paper substrate. |
The last step was to reroll the poster and wrap it in paper so that it could be transported and stored safely. Where and how you store collectibles like posters is important. (We will probably put up a post at a later date that covers the proper way to store posters and other paper art pieces.)
This
Star Wars poster was so big that it took us a couple of tries to properly roll it up, but we finally managed it. We also had some help from Catherine, a Poster Mountain former employee, who dropped by. Then we had some fun getting it into John W.'s car, but we managed it in the end.
 |
| Pictured: John W., Catherine and John rolling up the poster. |
 |
| Pictured: Catherin, Gabe and John gearing up to ram John W.'s car with the poster. Just kidding! |
 |
| Pictured: After a running start Catherine, Gabe and John got it into the car. (There was no running start, but if you can't have a little bit of fun whats the point, right? ) |
 |
| Pictured: We were able to gently and safely get the 10 feet of poster into John W.'s car. It just barely fit. There was some serious betting on whether or not it would fit, but we were all relieved that it did. |
So there you are. From start to finish a large scale poster project that is a great example of what Poster Mountain is all about. Professional conservation and restoration work with a lot of fun thrown in.
 |
| Pictured: The whole Poster Mountain crew around John W., from right to left is John, Robin, Aaron, Melissa, Derry, Chelsea, John W., Katie, Antonia, and Gabe. |
It should be noted that several crucial steps in our process have been omitted. If you have any questions please feel free to contact us via email at postermount@aol.com or by phone at 818.882.1214. Also check out our websites: www.postermountain.com and www.lapapergroup.com


Such a great post on Poster mounting.
ReplyDelete